
3 Ways To Improve PC Performance
Nothing stays new forever. The same goes with your PC. As it gets older, it gets slower. A time may come when your PC becomes so slow that it takes you hours to finish a job that would usually be done in minutes. This slow down in PC performance puts unnecessary stress on computer users and frustrates them.
In this article, you will be introduced to 3 simple methods to help you perform several computer fixes to speed up your PC.
Get rid of malware
If you notice a sudden slowdown in your computer’s performance, it usually indicates that the system is infected with a malware program, such as virus, Trojans, worms spyware, and adware. These programs infect your system with malicious codes and prevent it from working normally. Some of the common symptoms of virus infections are:
- Your programs fail to launch normally.
- There is a massive increase in computer errors.
- The performance of your computer deteriorates dramatically.
- Computer startup and shutdown takes a very long time.
Some of the common symptoms of spyware and adware infections are:
- Your Web pages are hijacked and redirected to affiliate Web sites.
- Web browser home page keeps getting changed to an affiliate Web site.
- Appearance of pop ads you did not ask for.
- You notice several services in Task Manager with names similar to legitimate system processes.
- Dramatic slow down in computer performance.
To prevent these troublesome problems and to completely get rid of these malicious software programs, it is essential for you to have two important tools—antivirus and antispyware. You need to update these tools with the latest virus database and run a thorough full system scan to detect and remove malware. For effective cleanup, you must run these scans in Safe mode.
Get rid of registry errors
The registry is an important part of your Windows operating system because it comprises essential configuration and system setup information that your computer and software and hardware on it require to function. When you are working on your computer, the registry is continuously accessed and modified by the programs accessing it. This continuous use of the registry makes it quite prone to attract unwanted entries that cause it to bloat up and eventually become fragmented and corrupt.
A registry with fragmented files and corrupt entries slows down, and starts generating computer errors. If ignored, this condition may worsen and even render your Windows computer unbootable. To prevent this situation, it is essential for you to regularly scan and clean your registry. The best and simplest way to do the task is by using a dependable and efficient registry tool. A good registry tool:
- Automates and thus simplifies registry scan and cleanup.
- Helps repair damaged registry entries and thus resolves several computer errors.
- Scans deep within the registry database and weeds out malicious virus and spyware entries to ensure their complete removal.
- Defrags the registry to compress and reindex it to speed up data access.
- Backs up the registry so that you can easily restore it in case of a problem.
Get rid of hard disk problems
Hard disk problems usually arise when:
- The disk gets filled up with a large amount of programs and files you no longer need
- The data stored on the disk gets severely fragmented
Both of these problems exert the hard disk, slow it down, and may eventually even cause physical damage to it. You can do the following to get rid of these problems and speed up your hard disk:
- Use Add or Remove Programs or a good third-party program uninstaller to uninstall all programs you no longer use.
- Use Disk Cleanup to get rid of unwanted deleted, temporary, and outdated files.
- Use Disk Defragmenter to rearrange hard disk data to make it contiguous.
Found this article useful?
Mention us in your post, subscribe to our feed, link to us, or bookmark this site.
Thanks for your support!


Quick Tip 101: Command Prompt from the Vista Desktop Right-Click Menu
If you don't already have a quick launch icon or a hotkey set to open a command prompt, there's really quick trick that you can do on any Windows Vista computer to open up a command prompt without having to navigate the menu.
Just hold down the Shift key and right-click on the desktop.
And then you can choose "Open Command Window Here" from the menu. The great thing about this is that the current path is the desktop, which is convenient for manipulating files on the desktop.
Of course you can always right-click on any folder icon in the system while holding down the shift key:
Or inside any folder:
Found this article useful?
Mention us in your post, subscribe to our feed, link to us, or bookmark this site.
Thanks for your support!
Windows Defender
Detect And Eliminate Malware Using Windows Defender
Windows Defender is a tool built in Windows Vista. Currently it's also available as a free download from Microsoft for Windows XP users.
This application lets you do manual, scheduled, and real-time scanning with automatic updates of spyware signatures, without a large performance penalty.
You can also use it to control what applications run at startup.
Of course, if you are already using a third-party anti-spyware application, there's really no reason to have Windows Defender's real-time scan enabled.
(You can get a performance increase by disabling it)
Firstly, to get to Windows Defender open your 'Control Panel' > 'Security' > 'Windows Defender'.
After playing around, you might notice Windows Defender is more than a scanning tool.
Select 'Tools' > 'Software Explorer'.
Now you can see the Windows Defender screen that lets you manage the startup programs.
You can choose to Remove or just Disable any startup item using this panel, as well as lots of other useful information so that you can see what each item is.
(Disabling startup program that you rarely use could improve booting up time)
One of the feature which I find annoying is the Real-Time scanning.
It's one of the reason which caused hard drive to be always busy. To disable it, simply go to 'Tools' > 'Options' and disable it.
Uncheck the box for 'Use real-time protection (Recommended)'.
This can be especially helpful on a laptop, as every little bit of tweaking helps improve battery life.
Just like another other protection tools, you can have automatic updates turn on so you won’t need to worry about updating the protection database.
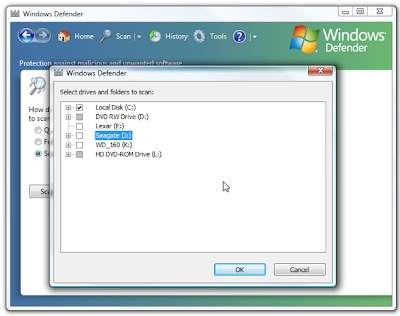
Windows Defender also provide us with several scan options.
Quick Scans - scans all essential OS directories
Full Scan - scans all files and folder
Custom Scan - it allows us to choose what to scan
Windows Defender is really a solid anti-malware application and has tons of features including scheduling scan times, viewing scan logs, and allowing user to control its behavior.
If you're a Windows XP user and has not install it yet, you can get it right here:
Download Windows Defender For XP and Server 2003
Found this article useful?
Mention us in your post, subscribe to our feed, link to us, or bookmark this site.
Thanks for your support!
Un-Freeze Vista Without Rebooting
Has Windows Vista ever freeze on your when you're trying to open certain program or trying to use certain Windows Component such as the Search Files Function?
Normally, the system freeze-up will occurred when you’re working on several file or document at the same time.
Rebooting the system is not a good option to solve this problem because you will lose any unsaved data in any open programs or document.
Here's a simple trick to fix this problem without rebooting and losing your work:
1. When a Windows component freezes and becomes unresponsive, press Ctrl + Alt + Del.
2. Click the Start Task Manager button
3. Click the Processes tab.
4. In the Image Name column, find the explorer.exe process.
5. Right-click on explorer.exe and select End Process
6. A Task Manager warning pop-up is displayed, Click Yes to end the process
This step should make the desktop, and possibly open applications, temporarily disappear.
7. In Task Manager, click on the File menu, and select New Task (Run…)
8. Type explorer.exe on the New Task windows, and click OK.
The Windows Explorer Shell should restarts and applications you had open previously, reappear.
That’s it, now you can continue working without worrying to lose data :)
Found this article useful?
Mention us in your post, subscribe to our feed, link to us, or bookmark this site.
Thanks for your support!
Vista Start Menu Power Button
It's so troublesome to shut down Windows Vista comparing to Windows XP.
Why am I saying this? Look at the picture below and you'll understand.
By default, the Start Menu Power Button puts Windows Vista to sleep.
Why call it Power Button when it's set to sleep by default?
Makes me wonder too.
While this may be fine for some, but for lazy people like me even an additional clicking is troublesome.
But no worries, here's one tip on changing this Power Button function.
You may want the Power Button to put your PC in hibernate mode or, just like me, you'd like the power button to simply shut down your PC.
Here's How:
1. Click on 'Start' > 'Control Panel'.
2. Click on 'Hardware and Sound'.
Note: If you're viewing the Classic View of Control Panel, you won't see this link. Simply double-click on the Power Options icon and proceed to Step 4.
3. Click on 'Power Options'.
4. In the 'Select a power plan' area, click on the 'Change plan settings' under the preferred/current plan for your PC.
5. Click on the 'Change advanced power settings'.
6. In the Advanced settings window, expand the available options by clicking on the '+' next to Power buttons and lid.
7. Then click on the '+' next to 'Start menu power button' to expand the available options.
8. Click on either 'On battery' or 'Plugged in' option to reveal a drop-down box.
9. Choose either Sleep, Hibernate, or Shut down.
10. Click OK and then close the Edit Plan Settings window.
And it's done, the Start Menu Power Button will do exactly what you've set now :)
Found this article useful?
Mention us in your post, subscribe to our feed, link to us, or bookmark this site.
Thanks for your support!
Hacking Vista Login
Yesterday a friend of mine asked me if there's anyway to login his Windows Vista without knowing the password.
Apparently he changed it and forgot the new password.
I believe quite a number of us encountered this problem too.
Changing and forgotten the new password or unable to recall the old one.
So I've decide to do some searching for my friend regarding this problem.
To my surprise, someone from China actually claimed that he's able to hack into Windows Vista without password in 3 minutes.
After doing some read up, this guy in fact did not really hack into Windows Vista, but instead he 'silently' changed the existing Windows Vista Administrator password without knowing it.
It's simple, everyone can do it and here's how:
Item needed : Windows Vista installation DVD
1. Reboot the Windows Vista and boot up with Windows Vista installation DVD.
2. While the Windows Vista installation interface pops up, click the Repair You Computer link at the bottom-left corner.
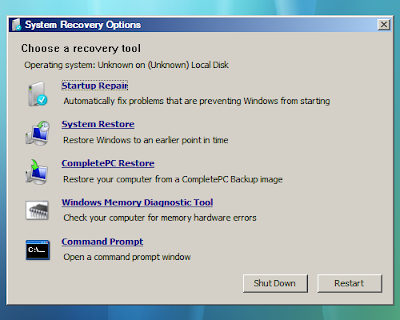
3. Next, the System Recovery Options dialog box appears. There are few options that related to repairing Windows Vista, looks like Recovery Console in Windows XP:
Startup Repair options is used to automatically fix problems that are preventing Windows Vista from starting.
System Restore to restore Windows Vista setting to an earlier point in time.
Windows Complete PC Restore to restore Windows Vista from a full system backup.
Windows Memory Diagnostic Tool could be the first Microsoft memory tester toolkit that bundled with Windows setup media.
Command Prompt is the target option of this Vista hacking guide.
Click on 'Command Prompt'.
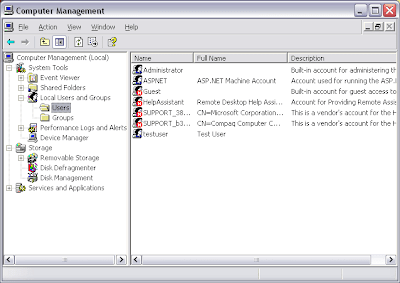
4. In the Vista Command Prompt, type 'mmc.exe' and press 'ENTER' key to bring up the Microsoft Management Console.
This Microsoft Management Console manages Individual and Group User accounts.
5. Click on the 'File' > 'Add / Remove Snap-in', locate and select 'Local Users and Groups' and click 'Add' button to add it to the right panel.
6. Click OK button and return to MMC windows.
Under the Console in left panel, double-click 'Local Users and Groups' that was added earlier. Click on 'Users' folder, locate and right-click the target Vista login account that found in the right panel.
By now you should know what to do now.
Select the Set Password from the right-click menu to set a new password/reset old password.
Regret to say I'm unable to prove it this really works as I don't have any Windows Vista Installation DVD with me, but if there's anyone who've tried do let me know if it really work!
But do remember this Trick is for user who hopes to regain a forgotten Vista Administrator password. Not for illegally hacking into a Vista system that belongs to other people.
Found this article useful?
Mention us in your post, subscribe to our feed, link to us, or bookmark this site.
Thanks for your support!
Vista Tuning for Notebooks
Starting up, shutting down and battery life are some of the major concern for Notebooks user.
Although a laptop's main advantage is portability, but I'm sure we would not want to run around often looking for power supply.
But why starting up and shutting down?
Personally, the reason I get a laptop is to use it anywhere I am with limited time I have on hand. But imagine, if I've only 1 hour before my next meeting and it takes 20mins for both booting up and shutting down. (Which often happens when you don't have time maintain your laptop)
Apart of common Tips and Tricks in improving Computer Booting up and Shutting down time, here's some Tips in improving both booting up time and battery life for Laptops only.
Disable transient multi-monitor manager to speed up boot times
Microsoft included the TMM program to make it easier for mobile users to connect and disconnect their laptops frequently from one or more separate monitors. Its main function is to detect when a new monitor has been plugged in and pop up a dialog allowing the user to easily configure said device. It also can add some unnecessary overhead, both at startup and by occasionally polling for the presence of D-SUB connected monitors.
To disable TMM:
Open the 'start' menu and right click on 'computer.' Choose 'manage.'
In the computer management window, navigate to 'task scheduler\Task scheduler library\Microsoft\Windows\MobilePC'
To disable the TMM function, right-click on it and choose 'disable.'
Tweak your Vista power saving options for more travel time
The Windows Vista power options allow a lot of fine customization, allowing you to sacrifice features and performance for better battery life on the go.
Better yet, you can save these settings and switch to and from them at will so you don't have to suffer when you are plugged in.
To create a custom power profile in Windows Vista:
Open the 'start' menu and type 'power'. Hit Enter.
In the power options window, select 'create a power plan' in the left-hand pane.
Choose 'power saver' as the default template and give your new plan a name, then hit 'next.'
Select any special display or sleep options you may want, then click 'ok'.
Your plan is created. Select it and choose 'change plan settings,' then 'change advanced power settings.'
Here you can tweak your new power plan for maximum battery life, based on how you usually use your laptop when it's unplugged. Some good suggestions for power savings are:
Turn off hard disks after 10 min or less of inactivity
Wireless adapter to maximum power saving mode (reduces range)
Search and indexing to power saver mode
Disable Aeroglass interface to save big on battery life
If your laptop has the graphical hardware to handle Aero, you should still disable it... At least when you are running on battery power.
The reason for this is that Aero actually uses the full power of your graphics card, forcing it to do more than just push pixels to the screen, and making your video card work eats more power, a lot more. You'll find your laptop travels a lot better once you've canned Aero.
To disable the Aero interface:
Right click on an empty area of the desktop and choose 'personalize'.
Select the 'window colour and appearance' option, then 'open classic appearance properties for more options.'
In the dropdown box, choose 'Vista Basic' and click 'OK'.
Found this article useful?
Mention us in your post, subscribe to our feed, link to us, or bookmark this site.
Thanks for your support!
What is svchost.exe And Why Is It Running?
You are no doubt reading this article because you are wondering why on earth there are nearly a dozen processes running with the name svchost.exe. You can't kill them, and you don't remember starting them… so what are they?
So What Is It?
According to Microsoft: "svchost.exe is a generic host process name for services that run from dynamic-link libraries". Could we have that in english please?
Some time ago, Microsoft started moving all of the functionality from internal Windows services into .dll files instead of .exe files. From a programming perspective this makes more sense for reusability… but the problem is that you can't launch a .dll file directly from Windows, it has to be loaded up from a running executable (.exe). Thus the svchost.exe process was born.
Why Are There So Many svchost.exes Running?
If you've ever taken a look at the Services section in control panel you might notice that there are a Lot of services required by Windows. If every single service ran under a single svchost.exe instance, a failure in one might bring down all of Windows… so they are separated out.
Those services are organized into logical groups, and then a single svchost.exe instance is created for each group. For instance, one svchost.exe instance runs the 3 services related to the firewall. Another svchost.exe instance might run all the services related to the user interface, and so on.
So What Can I Do About It?
You can trim down unneeded services by disabling or stopping the services that don't absolutely need to be running. Additionally, if you are noticing very heavy CPU usage on a single svchost.exe instance you can restart the services running under that instance.
The biggest problem is identifying what services are being run on a particular svchost.exe instance… we'll cover that below.
If you are curious what we're talking about, just open up Task Manager and check the "Show processes from all users" box:
Checking From the Command Line (Vista or XP)
If you want to see what services are being hosted by a particular svchost.exe instance, you can use the tasklist command from the command prompt in order to see the list of services.
tasklist /SVC

The problem with using the command line method is that you don't necessarily know what these cryptic names refer to.
Checking in Task Manager in Vista
You can right-click on a particular svchost.exe process, and then choose the "Go to Service" option.

This will flip over to the Services tab, where the services running under that svchost.exe process will be selected:

The great thing about doing it this way is that you can see the real name under the Description column, so you can choose to disable the service if you don't want it running.
Using Process Explorer in Vista or XP
You can use the excellent Process Explorer utility from Microsoft/Sysinternals to see what services are running as a part of a svchost.exe process.
Hovering your mouse over one of the processes will show you a popup list of all the services:

Or you can double-click on a svchost.exe instance and select the Services tab, where you can choose to stop one of the services if you choose.

Disabling Services
Open up Services from the administrative tools section of Control Panel, or type services.msc into the start menu search or run box.
Find the service in the list that you'd like to disable, and either double-click on it or right-click and choose Properties.

Change the Startup Type to Disabled, and then click the Stop button to immediately stop it.

You could also use the command prompt to disable the service if you choose. In this command "trkwks" is the Service name from the above dialog, but if you go back to the tasklist command at the beginning of this article you'll notice you can find it there as well.
Found this article useful?
Mention us in your post, subscribe to our feed, link to us, or bookmark this site.
Thanks for your support!
How to Deny Access to Files or Folders in Windows Vista
Most of us use our computers in a shared in environment with our family members, friends etc. But sometimes we may want set some permissions so that we can actually restrict access to certain folders which do not lie in our My Documents, My Pictures etc.
In this case when you can restrict access to a particular folder which could be any where on your hard drive.
Set File or Folder Security
Right click on the folder which you want to block from other users and select Properties.
Now click the Security tab in the folder properties window, and then click the Edit button.
Click on the Add button to open the "Select Users or Group" window.
Now you can enter the username of the account for which you want restrict access in the text box (Use the "Check Names" button to validate)
or
if you are not sure about the username then click the Advanced button, which opens the search window.
To search all users click the Find Now button and then locate the user which you want restrict access to the folder and click OK. Now, you will see the username listed in the Security Permissions window, click on the username to select.
Select the Deny Permissions for that user by checking the Deny box for Full Control.
Now, you will be shown a Windows Security message which in short says that Deny entries always override the allow permissions. Click Yes, and then click OK.
In this way you have restricted access to the folder for a particular user (in my example it was a guest user account in Vista).
Tip: You can also restrict access to all the users in vista type Everyone as the username, but this will also include your account as it is also a part of Everyone user group.
Found this article useful?
Mention us in your post, subscribe to our feed, link to us, or bookmark this site.
Thanks for your support!
GParted - Partition Solution For Vista
In the past, partitioning of hard disk can only be done during installation of Windows OS (Operating System).
Right now, technology is so advance that we can partition our hard disk anytime.
Even with Windows Vista installed and even with data in the current drive.
One of the more advanced options for resizing your Windows Vista partition is to use the GParted Live CD, a bootable linux CD that takes you straight into GParted, the great linux utility for managing partitions.
The only draw back using GParted is that if you resize your boot/system partition, you will be completely unable to boot without repairing windows.
(boot/system partition is the drive where Windows Operating System is installed)
First make sure that you have a bootable Windows Vista installation DVD or the restore disc you've created when you first start your Windows Vista, you'll need it for later part for repairing windows.
Next, download the GParted Live CD and burn it to cd.
(The file downloaded will be in .ISO format, application like Roxio will be able to burn it into cd. Alternative, you can also download InfraRecorder)
Boot off the GParted cd, and you will see your hard drives in the drop-down list. The first drive is typically your boot drive, but you can check the Flags column to make sure.
Next you'll need to right-click on the partition and choose Resize/Move from the menu.
Now you can either use the New Size textbox, or just click and drag the partition to make it smaller (or bigger). When you are done, click the Resize/Move button.
This doesn't immediately apply the changes, though. You can make other changes to your partitions and then when you are finished click the Apply button.
Depending on the amount of data and the speed of your computer, it can take quite a while to resize the partitions. On my computer it took more than 30 minutes.
Once it's done, quit, remove the live cd and then reboot your computer. Unless you are very lucky, you'll be greeted with this horrible error message saying "Windows Failed to start. A recent hardware or software change might be the cause."
File: \Windows\system32\winload.exeHere's a screenshot of the error, but don't worry, we'll fix it.
Status: 0xc0000225
Info: The selected entry could not be loaded because the application is missing or corrupt.

Insert your Windows Vista installation dvd and make sure you boot off it. At the welcome screen click the Next button.

On the next screen, click the "Repair your computer" link in the lower left hand corner.

The system recover options dialog will show up, and will ask you if you want to Repair and restart, which we do.

If you happened to click the View details link you'll see that the error is "Windows Device: Partition=Not found", which indicates the problem is the partition that we resized.

Your computer will reboot, and you'll see Windows Vista in the list although it now has a different name indicating that it was recovered.

When Vista first starts up, it will start running a check of the disk. Whatever you do, don't hit any keys here because we want the system to check the disk.

Once it's done it will reboot, and you'll have Vista back up and running again!
Found this article useful?
Mention us in your post, subscribe to our feed, link to us, or bookmark this site.
Thanks for your support!
