MacBook Air
Join CNET TV in First Look with the World Slimest Laptop MacBook Air!
Found this article useful?
Mention us in your post, subscribe to our feed, link to us, or bookmark this site.
Thanks for your support!


Monday, January 28, 2008 | 0 Comments
Windows Vista's Ready Boost
Like I mention previously, when you first buy and on your Windows Vista, everything seems fast.
Until a few weeks later, time seems to slow down, or your Windows Vista is slowing down.
I've written about how speed up your booting up and shutting down.
Now it's turn to speed up stuff that's in between.
As time goes on, opening and closing application seems to take longer than normal.
Games, Internet Explorer or FireFox doesn't seems to be response as fast.
So what can we do other than physically plugging in more RAM?
In fact, all Windows Vista comes with this useful function called Ready Boost.
It make use of your Memory Devices like Thumb drive, Memory Cards/Sticks to simulate it as a temporary place to store files which you often use.
(files are cache onto these memory devices for those more technical people)
Here's one problem, Windows Vista doesn't really accept just any memory stick.
There's a certain requirement or specification that's predefined.
(The device must be able to do 3.5 MB/s for 4 KB random reads uniformly across the entire device and 2.5 MB/s for 512 KB random writes uniformly across the device.)
Which means all our normal 1GB or even 4GB memory stick or card are kinda useless in this case if it doesn't meet it's requirement.
But wait, it's not the end yet.
You can actually tweak Windows Vista Registry to edit it's predefined requirements.
For some people it works like miracle, but some says this method only fools Windows Vista in believing the memory device is compatible but not really using it.
Personally, it isn't really useful for me as I rarely fully use up my 2GB RAM so I've tried but see no effect in performance.
So to try it or not is up to you, but here's the trick =)
Plug in your memory device (Memory Stick, Card, Thumb Drive) into you PC or Laptop.
Ignore and close of the Auto Play.
Go to 'My Computer', right click on your memory device and select 'Properties'.
Under 'Ready Boost' tab, select or check the box 'Stop Retesting This Device When I Plug In'.
Click 'OK' and unplug the memory device from your machine.
Next is to edit the Registry.
As usual, always remember to create a System Restore Point when editing any Registry.
(For more information or instruction, browse for older post)
Press the Windows key + 'R' and the Run Command Window will pop-up.
Type in 'regedit' and hit 'Enter' or click on 'OK'.
You will then see the Registry Editor Window, simply located the following folder or path:
HKEY_LOCAL_MACHINE > SOFTWARE > Microsoft > Windows-NT > CurrentVersion > EMDgmt
(HKEY_LOCAL_MACHINE/SOFTWARE/Microsoft/Windows-NT/CurrentVersion/EMDgmt)
Under EMDgmt is the list of USB device installed to your machine.
Simply locate your memory device and double click it.
Then you will see a list of Registry thats associate with your memory device.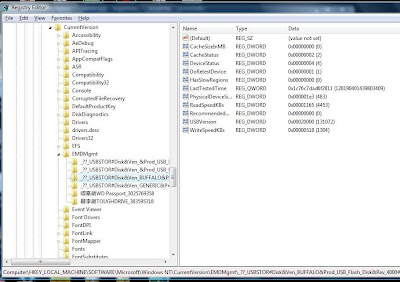
Here's the important steps.
1.Double click on 'Device Status' and change the value to '2'. 2.Double click on 'ReadSpeedKBs' and change the value to '1000'. 3.Double click on 'WriteSpeedKBs' and change the value to '1000'.
Once you've done these 3 steps, close Registry Editor Window.
(Remember to double check that you've change the value of the right Registry)
Lastly, follow the first few steps, plug in your memory device and go to 'My Computer', right click on your memory device and select 'Properties'.
This time round under 'Ready Boost' tab select 'Use This Device' and it should start working.
So do feed back if it work for you if you've tried =)
Found this article useful?
Mention us in your post, subscribe to our feed, link to us, or bookmark this site.
Thanks for your support!


Monday, January 21, 2008 | 0 Comments
Common Windows Media Player Errors
Microsoft Windows Media Player is a Windows component that is shipped with various versions of Windows operating systems.
The latest Media Player version is 11, which is shipped with the Windows Vista operating system.
Additionally, you can install it on Windows XP and Windows 2003 computers.
Discussed here are a few common Windows Media Player problems and their resolution methods.
Audio Plays, Video Does Not Play
If the codec required to play a particular type of audio or video files is not installed on your computer, the following errors may be generated on the system.
”Windows Media Player cannot play the file because the required video codec is not installed on your computer."
”Windows Media Player cannot rip files; play, burn, or sync the file because a required audio codec is not installed on your computer.”
”A codec is required to play this file. To determine if this codec is available to download from the Web, click Web Help.”
To resolve this issue and prevent future problems, configure Windows Media Player 11 to automatically download updates from the Internet. To do this, perform the following steps:
- Go to the Tools menu and select the Options command.
- On the Player tab, select the Download codecs automatically check box, and then select the OK button.
Now, try to play your audio/video file again—ensure that you are connected to the Internet. If prompted, select Install to install the codec and resolve the error.
Unable to View, Add, Delete Items to Media Player Library
The database of Media Player 11 has been overhauled and made more robust.
It also includes a self repair feature that helps it automatically recover from minor problems.
However, at times, the database might get corrupt and cause the following problems on the system:
- You cannot view, add, or delete items in the library.
- Any media information changes done by using the Apply media information changes option are not applied and the progress indicator is not displayed on the screen.
- You receive frequent database corrupt messages.
To resolve this problem, you will have to clear the Windows Media Player database by performing the following steps:
- Close the Windows Media Player 11 application.
- Run the following command based on your operating system.
On Windows XP:
Open Start menu, select Run, type %userprofile%\Local Settings\Application Data\Microsoft\Media Player, and then select the OK button.
On Windows Vista:
Open Start menu, select Run, type %LOCALAPPDATA%\Microsoft\Media Player, and then select the OK button. - In the Media Player folder that opens, select all the files, right-click and then select the Delete command.
- Restart Windows Media Player and make the required changes to verify that the problem has been resolved.
Unable to Uninstall Windows Media Player Updates
If you are having a problem with Windows Media updates on your Windows XP computer, then you can uninstall them from the Control Panel. To do this, perform the following steps:
- Open Control Panel.
- Select the Add or Remove link.Select the Show Updates check box that exists in the upper part of the Add or Remove Programs window.
- Next, in the Currently installed programs list, locate the Windows Media Player update option.
- Select each option one-by-one and uninstall them by selecting the Remove button.
After you have uninstalled all Media Player updates, close the Add or Remove program window and reboot your system.
For troubleshooting PC problems and preventing Media Player and other computer errors from occurring, it is important that you perform regular preventive maintenance.
Some of the simple tasks that you can do are:
Use a registry cleaner tool to perform registry scan, repair and defrag to maintain an error-free registry.
Use antivirus and antispyware tools to ensure that your system is free from malware information, and use Disk Cleanup and Disk Defragmenter tools to maintain a problem-free optimal hard disk.
Found this article useful?
Mention us in your post, subscribe to our feed, link to us, or bookmark this site.
Thanks for your support!


Thursday, January 17, 2008 | 0 Comments
Speeding Vista/XP Shut Down
By Default both Windows Vista and XP set aside 20 seconds for all running program to save/close and shutdown.
There are 2 ways in seeing this situation, or should I say 20 seconds.
1. When you’ve decided to shut down your PC or Laptop, you should’ve already save whatever you need to save. No one will shut down without saving.
So why must we still wait for these 20 seconds?
2. Why care so much about this 20 seconds when you can just simply walk away after clicking the ‘Shut Down’ button.
No one ask you to sit there and wait for it to completely shut down.
Depending on personal preference, but here’s a tweak for Windows Vista and XP to shorten this 20 seconds.
Use it or not, up to you =)
This tweak involves in editing of your Windows Registry, so before you start please remember to set a ‘System Restore Point’.
(Refer to past post for more information)
Here are the steps.
Simply press the Window Key on your Keyboard + ‘R’.
This will toggle the ‘Run Dialog’.
Enter ‘regedit’ and Click ‘Ok’.
For Windows Vista user, a User Account Control will pop-up, simply click 'Continue'.
The Registry Window will then pop out.
(It may seem complicated, but no worries. Simply follow the following steps closely and you will make no mistake.)
Browse or navigate to this folder: HKEY_LOCAL_MACHINE\SYSTEM\CurrentControlSet\Control
(HKEY_LOCAL_MACHINE > SYSTEM > CurrentControlSet > Control)
Under this ‘Control’ folder you will see some unknown files or so called Registry.
Look out for the one called ‘WaitToKillServiceTimeOut’.
It should have a value of ‘20000’ beside it.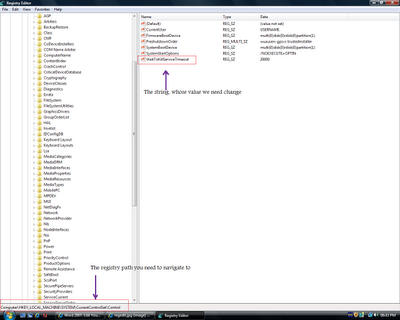
Simply double click on this ‘WaitToKillServiceTimeOut’ and change the value to ‘5000’
(5000 is the suggested value)
Note: All values are in Milliseconds.
Which means 20000/1000=20seconds.
5000/1000=5seconds.
After setting simply close Registry Window and it's complete.
About this value or seconds, a lot of people are saying different stories about it.
Some IT experts suggested setting it no lesser than 5 seconds but a lot of user finds it ok to set it less than 5seconds.
Set any timing at your own risk as different system might perform differently even for the same timing.
Some people reduced their shutting down time to 5seconds when they set ‘WaitToKillServiceTimeOut’ to 3 seconds while some unable to boot up their Laptop or PC when they set it the same way.
Found this article useful?
Mention us in your post, subscribe to our feed, link to us, or bookmark this site.
Thanks for your support!


Wednesday, January 16, 2008 | 0 Comments
Speeding Vista Boot Up
When you initially purchase a new PC or Laptop, Windows Vista tends to boot up and shut down quite fast.
But as time goes by, it seems to take a longer time until a stage where you will be sitting in front of your PC or Laptop waiting for minutes for it to boot up or shut down.
Here’s some trick, which you can do to speed up your Windows Vista Booting Up.
Disable all unnecessary program that automatically loads up during start-up.
Why have programs starting up when you don’t really use them. Even for those you often use, you can always start them manually by clicking on them.
Here’s how you disable all unnecessary program that automatically loads up during start-up.
Click on Vista Start Icon on the bottom left of your screen and type ‘MSCONFIG’ in the search box.
Then double click on the program that appears in the result box.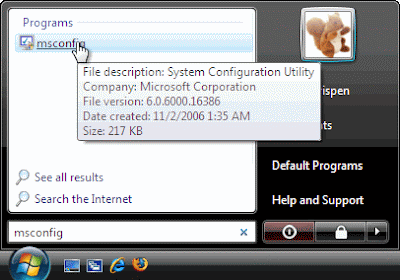
A User Account Control Window will pop up prompting you if you wish to continue.
Click ‘Continue’ to move on to the next step.
Upon successfully launching of Microsoft’s System Configuration Utility, click on the ‘Startup’ tab.
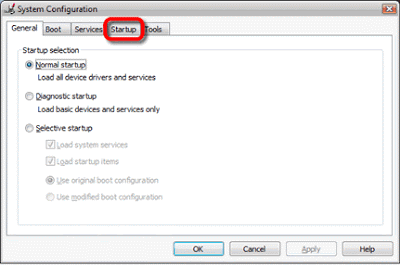
You will then be presented with the list of programs that will automatically loads up when you starts Windows Vista.
Some startup programs are absolutely necessary, while other is simply a waste of RAM.
Simply disable those programs that you don’t wish it to load up during start up.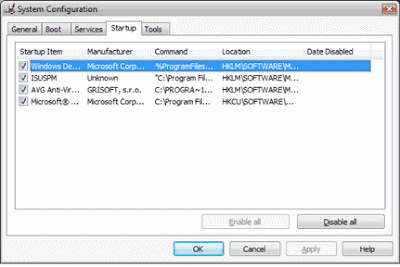
Please note, disable only those programs that you recognize and don't need to have running all the time. When in doubt, leave it on.
Here’s another trick, for people who have multiple Operating System installed to their PC or Laptop and often only uses one out of other Operating System.
(In case you don’t know, always installed Windows Vista first before installing older version of Windows, recommended by Microsoft)
For both Windows Vista and XP, they automatically set aside 30 second for Boot Menu.
Boot Menu is for machine that is installed with Multiple Operating System and user will be given a Timeout of 30 seconds to select the Operating System they want.
You can’t disable this Boot Menu as it’s automatically created by Windows when you install more than one Operating System.
To save the trouble and time of selecting, here are the steps to change this Timeout timing.
Simply follow the steps of the First Trick until you have opened the Microsoft’s System Configuration Utility.
But this time round, you will select the ‘Boot’ tab instead of the ‘Startup’.
Under ‘Timeout’ you will see that the default timing set is 30 seconds.
Set the timing to 3 seconds, click ‘Apply’ and ‘Ok’.
(3 seconds is recommended because it gives you enough time to select other Operating System when needed, to save the trouble of repeating the steps and rebooting)
Note: The down side of this trick is, if the system isn’t properly shut down. You will not be able to read the boot options when they appear before it times out and automatically selects the default option.
For both settings, simply restart your PC or Computer and you will notice increase of speed in booting up =)
Found this article useful?
Mention us in your post, subscribe to our feed, link to us, or bookmark this site.
Thanks for your support!


Tuesday, January 15, 2008 | 0 Comments
Make Your FireFox Work Faster
Are you wondering why your FireFox are responding so slow even if you are having a fast Internet Connection?
Here's a short video to teaching you on how to solve this issue =)
Learn how to tune your FireFox to suit your internet speed.
Special credits giving to VistaMeetsNick for making this wonderful and useful video!
Enjoy!
Found this article useful?
Mention us in your post, subscribe to our feed, link to us, or bookmark this site.
Thanks for your support!


Tuesday, January 15, 2008 | 0 Comments
Disabling UAC
Are you fed up with the message that kept popping up whenever you open a program or trying to install something?
Here's a short video to teach you on how to solve this issue =)
Enjoy!
Found this article useful?
Mention us in your post, subscribe to our feed, link to us, or bookmark this site.
Thanks for your support!


Friday, January 04, 2008 | 0 Comments
Windows Key + Short Cut
Many of you may have already know many shortcut keys for Windows XP.
But what about Windows Vista?
Some might still be the same, but some might surprises you =)
Check the following video out for Tips on Windows Vista short cut.
Hope you enjoy the Video.
Found this article useful?
Mention us in your post, subscribe to our feed, link to us, or bookmark this site.
Thanks for your support!


Wednesday, January 02, 2008 | 0 Comments
